
The Unix Shell
Cluster Computing and PBS Commands
Learning Objectives
- Understand how a cluster differs from a desktop computer
- Be able to submit a job to a queue and check its status
A cluster computer is a supercomputer constructed from individual cheap, replaceable computers (called nodes) that are linked by a fast network. Each node has its own operating system, usually a Linux variant. In a typical setup, one of the nodes in the cluster is configured as the head node, which acts as the controller for the cluster. The remainder of the nodes are configured as compute nodes. Through the use of specially designed software, the nodes of a cluster act as a single computer.
A typical cluster is diagrammed here:
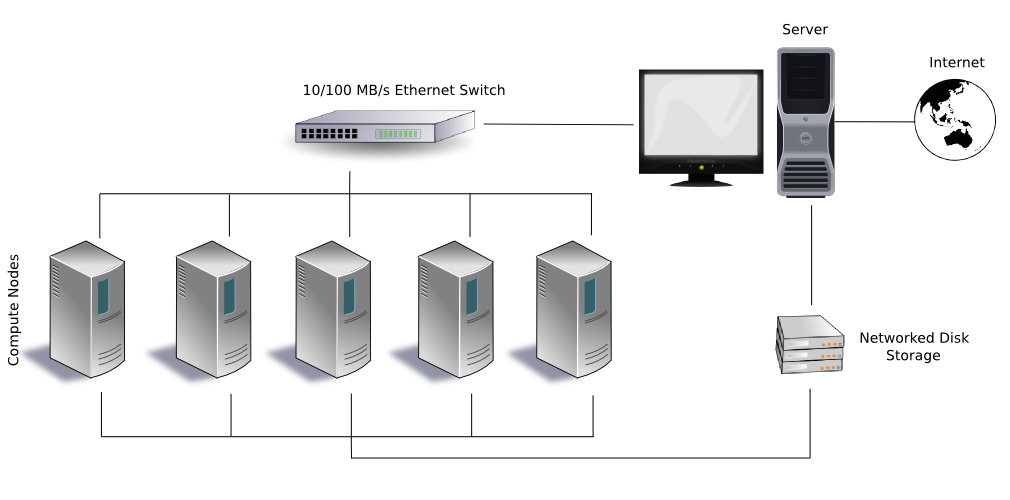
A typical cluster computer configuration. (Public domain image from https://en.wikipedia.org/wiki/File:Beowulf.png)
Note how the outside world can only communicate with the cluster through the server (i.e., the head node, in the terminology we’re using); the compute nodes are hidden. The head node is linked to the compute nodes through a local network. The head node and the compute nodes may also share a locally networked storage device.
CSDMS maintains a cluster computer, beach, an SGI Altix XE1300 with 88 Altix XE320 compute nodes. Each compute node is configured with two quad-core 3.0 GHz E5472 (Harpertown) processors, for a total of 704 cores. Twenty-six of the 88 nodes have 4 GB of memory per core, while the remainder have 2 GB of memory per core. The cluster is controlled through an Altix XE250 head node. Internode communication is accomplished through either gigabit ethernet or over a non-blocking InfiniBand fabric. Each compute node has 250 GB of local temporary storage. All nodes are able to access 36 TB of RAID storage through NFS.
The typical way of working on a cluster is to submit a job to the scheduler that resides on the head node. A job is organized as a script, typically written in bash or in Python, that contains commands to perform tasks. If more than one job is scheduled, they’re assigned to a queue by the scheduler. When adequate computing resources become available, a job is popped off of the queue and run. After the run completes, any output can be collected and transferred from the cluster to a user’s local computer.
The CSDMS cluster uses the TORQUE job scheduler, which employs PBS commands to submit and monitor jobs on the cluster. Key PBS commands are:
qstatto show the status of a jobqsubto submit a job to the queueqdelto remove a job from the queue
Detailed information on these commands can be found on their respective man pages; e.g.,
$ man qsubTo access the CSDMS cluster, log into the head node of beach from your computer, using the ssh (“secure shell”) command:
$ ssh [username@]beach.colorado.eduBe sure to replace [username] with the user name assigned to you on beach. You’ll be prompted for your password on beach, which is your CU IdentiKey. A successful login will look something like this:
Last login: Mon May  9 13:17:19 2016 from solaria.colorado.edu
]
] For assistance please mail trouble@colorado.edu
]

$
The command promp is now interacting directly with beach. Check that you’re in your home directory:
$ pwdWe can check the jobs that are running or queued on beach with the qstat command:
$ qstatJob ID Name User Time Use S Queue
------------------------- ---------------- --------------- -------- - -----
195567.beach WBMsed3.11 frdu8933 295:39:1 R himem
195568.beach WBMsed3.8 frdu8933 295:34:1 R himem
195569.beach WBMsed3.5 frdu8933 0 Q himem
195570.beach WBMsed3.2 frdu8933 0 Q himem
195571.beach WBMsed3.10 frdu8933 0 Q himem
195578.beach WBMsed3.3 frdu8933 0 Q himem
195972.beach dem jimc5170 24:54:08 R default
196667.beach dem jimc5170 45:57:19 R default
196670.beach dem jimc5170 44:18:05 R default
196673.beach dem jimc5170 44:31:45 R default
...The output from qstat shows the job id, the job name, the job owner, how long the job has been running, the status of the job (R is running, Q is queued), and the queue in which the job has been slotted.
Cluster computers often have several queues with different properties, for example, a high-memory queue, a long run queue, a debug queue, and a default queue. When submitting a job to the scheduler, a user can choose an optimal queue for their job. View the available queues on the CSDMS cluster with qstat:
$ qstat -qThe -q flag prompts qstat to output only queue information.
server: beach.colorado.edu

Queue            Memory CPU Time Walltime Node  Run Que Lm  State
---------------- ------ -------- -------- ----  --- --- --  -----
ocean-owner        --      --       --      --    0   0 --   E R
wrf-owner          --      --       --      --    0   0 --   E R
ocean-special      --      --       --      --    0   0 --   E R
route              --      --       --      --    0   0 --   E R
total              --      --       --      --    0   0 --   E R
wrf                --      --    12:00:00   --    0   0 --   E R
default            --      --    96:00:00   --  105  77 --   E R
himem              --      --       --      --    2  10 --   E R
debug              --      --    02:00:00   --    0   0 --   E R
long               --      --       --      --    0   0 12   E R
wrf-special        --      --       --      --    0   0 --   E R
vip                --      --    24:00:00   --    0   0 --   E R
ocean              --      --    12:00:00   --    0   0 --   E R
                                               ----- -----
                                                107  87
To demonstrate how to submit and monitor a job on the CSDMS cluster, we’ll use the examples from the code-shell directory. However, these files are on your local computer. We need to transfer the files from your computer to beach. Start by opening a new terminal window on your computer. This new command promp will be connected to your local computer, not beach! Change to your Desktop directory and get a directory listing:
$ cd ~/Desktop
$ ls
code-shell data-shellTo transfer the code-shell directory to the server, we use the scp (“secure copy”) command. In the terminal on your local computer, type:
$ scp -r code-shell [username@]beach.colorado.edu:~Here, the -r flag tells scp to recursively copy the contents of the code-shell directory, while the ~ at the end of the command is the location to copy to on beach, your home directory. Be sure to replace [username] with your beach user name. You’ll be prompted for your beach password. Your output should look approximately like this:
calculate_pi.pbs.sh                                      100%  343     0.3KB/s   00:00
calculate_pi.py                                          100%  608     0.6KB/s   00:00
simple.pbs.sh                                            100%  136     0.1KB/s   00:00
Switch back to the terminal you were using before, where you’ve connected to beach. Change to your home directory and check that the files are present:
$ cd
$ lscode-shellNext, move to the code-shell directory and list its contents:
$ cd ~/code-shell
$ ls
calculate_pi.pbs.sh calculate_pi.py simple.pbs.shThe file calculate_pi.pbs.sh is an example of a PBS script. Dump the contents of this script to the terminal with cat:
$ cat calculate_pi.pbs.sh#!/usr/bin/env bash
# A PBS script that calls a Python script that calculates an
# approximation to pi. Submit this script to the queue manager with:
#
# $ qsub calculate_pi.pbs.sh
cd $PBS_O_WORKDIR
echo "Calculating pi with the Bailey–Borwein–Plouffe formula"
echo "Start time:" `date`
python calculate_pi.py 20
echo "End time:" `date`Let’s examine this script. The first several lines, prefaced with the # character, are comments, although the first line is important because it identifies the file as a bash script. $PBS_O_WORKDIR is a PBS environment variable that points to the current working directory. The echo command prints to standard output. The line beginning with python calls the Python script calculate_pi.py, telling it to calculate 20 successive approximations to π. This script, when run, will print the approximations to π to standard output.
Submit this script to the debug queue with qsub:
$ qsub -q debug calculate_pi.pbs.shThe scheduler returns a job id:
197387.beach.colorado.eduOrdinarily, a job can be queried with qstat, but this job runs really quickly. In fact, by the time you’ve read this, it will likely have completed.
Let’s look at the output. List the contents of the current directory:
$ lscalculate_pi.pbs.sh calculate_pi.pbs.sh.o197387 simple.pbs.sh
calculate_pi.pbs.sh.e197387 calculate_pi.pyNote that new files, with extensions e (for error) and o (for output), plus the job id, have been created. Let’s look at these files.
$ cat calculate_pi.pbs.sh.e197387No errors, great!
$ cat calculate_pi.pbs.sh.o197387Calculating pi with the Bailey–Borwein–Plouffe formula
Start time: Wed May 11 10:35:57 MDT 2016
1 3.133333333333333333333333333
2 3.141422466422466422466422466
3 3.141587390346581523052111287
4 3.141592457567435381837004555
5 3.141592645460336319557021222
6 3.141592653228087534734378035
7 3.141592653572880827785240761
8 3.141592653588972704940777766
9 3.141592653589752275236177867
10 3.141592653589791146388776965
11 3.141592653589793129614170563
12 3.141592653589793232711292261
13 3.141592653589793238154766322
14 3.141592653589793238445977501
15 3.141592653589793238461732481
16 3.141592653589793238462593174
17 3.141592653589793238462640594
18 3.141592653589793238462643226
19 3.141592653589793238462643373
20 3.141592653589793238462643381
End time: Wed May 11 10:35:57 MDT 2016More information on submitting and monitoring PBS jobs, including examples, can be found on the CSDMS web site.
Where is your job running?
After you submit a PBS script to the scheduler, you can use qstat to find which compute node(s) in the cluster your job is running on. Look through the qstat man pages to find the command and test it out.
Email notification
What flags can you give qsub to send you an email when your job completes?